Tuesday, August 17, 2010

Week 4

This week I was introduced to the dust echoes website, which contains short animation films relating to Aboriginal stories and culture. It was not one that I had heard of before, but I am glad I have had the opportunity to see it as I think it is a great site and one that I hope to use in the future. Each film also has an accompanying study guide which is a great teacher resource.

We watched the 'Mermaid Story' film together and were then asked to choose one film to watch, and then use the Inspiration program we were introduced to in week one to re-tell the story through images and text.


I chose to watch 'Brolga Song' and then I used MS Paint to capture images from the film and upload them into Inspiration. We were then able to move about the room and see each other's work, and some of the creative ways that people had chosen to lay out their story's were amazing. I think this would be a great English exercise for students to undertake, as it particularly relates to sequencing.


The second half of this week's workshop was all about MS Excel. I have used Excel a lot in my previous jobs, and have created many graphs and charts in my time! Today we used M&M's as the data to be included in the spreadsheet, and created a chart that depicted the number of different coloured M&M's were in a bag.
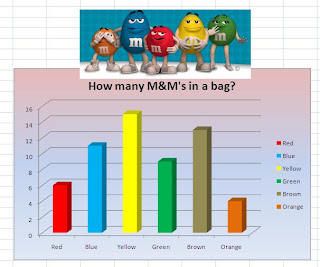

One thing I learnt that I hadn't really explored in Excel before was to make the charts fun - make it colourful and drop in images. We used the M&M website to find images to include, and this is easily something that Primary students could do too. Interpreting and understanding the graphs is the next step for students to extend their knowledge. This could be done by adding more visuals to the graphs such as labelling the data. Students could combine their results to create a new set of data and new charts to compare the differences, or even use another bag of M&M's to see whether the results are similar.


I have always recognised that graphs and data is essential in the maths curriculum, but today really showed me that there are easy ways to make it fun for the students.

Tuesday, August 10, 2010

Week 3

In this week's workshop the focus was on design and creativity.
Firstly, we learnt about the value of a design brief and were
provided with an example that you can see here. It is broken
down into sections which are Investigate/Design, Produce and Analyse/Evaluate. I learnt that this is a good tool for students to use at the beginning of a design project to help them gather their ideas, but that it is also a good idea for a final good copy to also be submitted to clearly see the steps that the students work through.

We had the opportunity to plan and implement a design brief as we were given a problem to solve. We had to make a picture of a frog jump, and were only allowed to use a rubber band, sticky tape and cardboard.


My group decided to fold the cardboard into 4 to create a concertina effect. We stuck the picture of the frog onto the face of the cardboard using the sticky tape and looped the rubber band through the cardboard.


When we pressed down on the frog the result was like a spring action and froggy jumped! It was great to see first hand how completing the design brief goes hand in hand with creating the final product and I think is a great way to provide some structure and scaffolding to students when they complete a similar task. To extend this task we could have looked at using different sized cardboard, or testing how far or high froggy jumped in comparison to other teams results. One thing that I really took away from this activity is that 'technology' in terms of the curriculum doesn't necessarily have to be computer based. A hands-on materials based activity such as this is also incredibly valuable for students.

The next activity was to look at some online technologies, and in particular online games. We were introduced to www.quia.com/web and were able to explore the games we could create through this site.


First I created a quiz, which was a simple multiple choice about farm animals. As a group we were then able to have a go at trying each others quizzes which was a lot of fun. I think this would be a fantastic activity for students to show their understandings of a topic they have just studied. At the primary school where I did my first placement they have implemented an accelerated reading program where each time they finish a book they have to complete a comprehension quiz on the computer. I think that a really great exercise to couple with this would be for students to create their own quiz about a book they have read. Another classmate or the teacher could then read that book and answer the student's quiz.


In addition to the quiz we learnt about the different activities that can also be created on this site such as hangman, word jumbles, word searches, concentration cards and many many more. I really enjoyed using this site and will try to use it on my next practicum to see how the students respond to it.

Here are some of the other games I
created in this workshop


Tuesday, August 3, 2010

Week 2


The focus of week two's workshop was on using MS Publisher and the job application process we will all soon be going through.


I have used MS Publisher before, mostly for school projects or invitations. In fact for an assignment due in semester one my team and I created a brochure. Funnily enough, this was the first thing we created in this week's workshop.


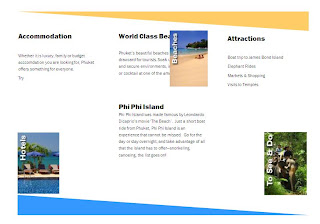
I began creating my brochure on Phuket, a holiday destination in Thailand. I chose what I thought was a 'beachy' feel for the colour template and began entering text and images. Because I have used the program to make brochures before I didn't find this activity too difficult, however I do sometimes find Publisher to be a bit 'finicky' for lack of a better word, and the formatting of the different sections can sometime be hard to get perfect which can be incredibly frustrating. I think Primary students would really love to be able to make something like this, but I think it would be best suited to the older grades.


The next activity was to create an e-Portfolio, also in MS Publisher. I have heard a lot of talk about portfolio's this year so was interested to learn how I could go about creating one. I put together a rough outline of some of the things I would include in my e-Portfolio to get a feel for how it would work.
The template itself was quite easy to create, and I really like the way the program makes it clear and easy to navigate around the portfolio and jump from page to page. The types of headings that our class talked about including were things like About Me, Educational Philosophy, Resume and Achievements. All of these thing suddenly gave me a lot to think about. We also talked about including photos where possible, and I think this will really add value.
I have heard mixed feelings towards the need for a Portfolio when going for an interview. The union said its not that big of a deal, some teachers don't think it's necessary whereas others spent hours putting theirs together and think it is crucial. At this stage, I am not sure what to think, however I would rather have one and not need it than need one and not have it!
I like the look of the e-Portfolio's we were able to create in Publisher, however as this is not a program I have at home I don't think it will be useful to me. I plan to create my e-Portfolio in MS Powerpoint and hope to be able to create something that looks just as professional and engaging.